How to Install a Dash Cam and Hide the Wires
To install a dash cam with hidden wires, mount it behind the rear-view mirror, tuck the power cable into the gap between the headliner (roof lining) and the windshield (windscreen), run it down the A-pillar under the rubber door seal while keeping it clear of the curtain airbag, then along the side of the dash to the 12V socket or the fuse box. A nylon trim tool does nearly all the work, and the plug-in version needs no wiring at all.
What you need
- Your dash cam, its mount and its power cable
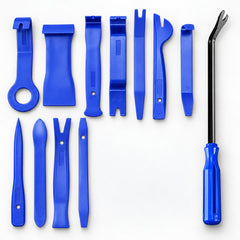
- A trim removal tool kit. Nylon is softer than paint and trim, so you can push cable into gaps and lift trim edges without scratching anything.
- Rubbing alcohol (isopropyl) and a clean cloth
- Small zip ties, cloth wiring tape and a few adhesive cable clips
- Your owner's manual, for airbag locations and the fuse box diagram
- For hardwiring: a hardwire kit with a low-voltage cutoff, add-a-fuse taps that match your car's fuse type (standard, mini, low-profile mini or micro2), a circuit tester and crimping pliers
- A small socket for the ground bolt. A 1/4-inch socket and bit set with 4-14 mm sockets and Torx bits suits the small fasteners around a dashboard.
Before you start
- Check the law where you drive. Many places ban anything that blocks the driver's view through the windshield, and some US states, California among them, only allow windshield-mounted items in specific small zones. Some places also restrict recording audio of passengers.
- Find your airbags. "SRS" or "AIRBAG" markings on the A-pillar trim or the headliner above the side windows mean a curtain airbag sits behind that trim. Your manual shows where.
- Choose your power source. The 12V socket (cigarette lighter) is plug-and-play. Hardwiring to the fuse box frees the socket, hides every wire and is the usual way to power a parking mode.
How to install a dash cam step by step
Step 1: Pick the mounting spot
- Mount it just to the passenger side of the rear-view mirror, out of your line of sight.
- Make sure the wipers clear the glass in front of the lens, or rain will ruin the footage.
- Avoid the tinted band or dotted black area at the top of some windshields.
- Keep clear of the car's own camera or sensor housing behind the mirror, which many cars use for lane keeping and automatic braking.
- Power the camera up with the cable loose and check the view before you commit. Adhesive mounts are hard to remove once stuck.
Step 2: Fit the mount
Clean the glass with rubbing alcohol and let it dry. Press the mount on firmly, and follow the camera maker's advice on how long the adhesive needs before you hang the camera.
Step 3: Tuck the cable into the headliner
- Plug the cable into the camera, leaving a small loop of slack so you can adjust the camera later.
- Run the cable straight up to the edge of the headliner.
- With a flat nylon tool, push the cable into the gap between the headliner and the windshield, a few centimeters at a time, toward the A-pillar on the side of your power source.
- Push it in only far enough to hold it.
Step 4: Run it down the A-pillar, clear of the airbag
The A-pillar is the post between the windshield and the front door. This is the one part of the job that needs real care.
- Pull the rubber door seal off the body along the A-pillar. On most cars it simply presses on.
- If the pillar trim is marked SRS or AIRBAG, a curtain airbag is folded behind or above it and needs a clear path to deploy.
- Never route the cable in front of the airbag or across its path, and never zip-tie it to the airbag or its mountings. A cable in the way can stop the airbag inflating properly or become a hazard when it fires.
- The usual routes are along the outer edge of the pillar, tucked under the door seal, or behind the airbag, taped to the car's existing wiring. Which is right depends on your car, so follow the vehicle maker's guidance.
- If you need to remove the pillar trim, follow your car's service procedure. Some cars use pillar clips meant to be replaced once removed. Never unplug or probe airbag wiring, which is usually yellow.
- Press the door seal back on firmly along its whole length.
Step 5: Run it to the power source
- Continue down the side of the dashboard, under the door seal or behind the side trim.
- Route the cable under the dash or behind the glovebox to the 12V socket or the fuse box.
- Secure it with zip ties or tape, well away from the pedals, steering column, glovebox hinge and seat rails, so nothing can catch or pinch it.
- Bundle any spare cable neatly out of sight under the dash.
Step 6: Test everything
Start the car and check the camera powers up, records and shows the right date and time. Open and close the front door to make sure the seal sits flat, and look for trim bulging over the cable.
When you lift any trim, pry right next to a clip, never mid-panel, as in our guide on how to remove a car door panel.
How to hardwire a dash cam to the fuse box
Hardwiring frees the 12V socket and can power parking mode, where the camera keeps watch while the car is parked. A hardwire kit usually has three wires: switched (live only with the ignition on, often labeled ACC), constant (always live, for parking mode) and ground. Colors vary, so go by the labels.
- Find the fuse box. Many cars have one in the cabin and another under the hood. Your manual shows what each fuse does.
- Pick suitable circuits. Use non-critical ones, such as the accessory socket. Never tap the fuses for airbags, ABS, engine management, the fuel pump or lights.
- Test them. With a circuit tester, a switched fuse is live only with the ignition on, and a constant fuse is live with it off. Also find which side of the fuse slot is live (the supply side).
- Fit the add-a-fuse. Put the car's original fuse in the tap's original-fuse position and the fuse your kit specifies in the other. Fit the tap so its input leg sits on the live side of the slot: fitted backwards, the original fuse ends up protecting both circuits. Never use a higher-rated fuse than the circuit had.
- Connect the ground. Fit the ground terminal under a bare-metal bolt on the car's body near the fuse box. Never use a bolt that holds an airbag, seat belt or other safety part.
- Set the low-voltage cutoff. It switches the camera off before parking mode drains the battery too far to start the car. Follow the kit's instructions.
- Test it. Ignition on, the camera should start. Ignition off, it should switch to parking mode or turn off, depending on how you wired it.
The wrong circuit can cause faults on modern cars. If you can't confirm the right fuses with a tester, get a professional install; some dash cam makers advise a qualified installer for this part.
Adding a rear camera
Run the rear cable along the headliner toward the back, the same way as the front. Curtain airbags also run along the roof edge above the side windows, so tuck the cable in only a few millimeters there, never across an airbag, and follow your vehicle maker's guidance. On a hatchback or SUV, the cable usually reaches the tailgate through the flexible rubber sleeve that carries the tailgate wiring. On a sedan, it runs down the rear pillar to the rear window.
Troubleshooting and mistakes to avoid
- The camera stays on with the engine off. On some cars the 12V socket is always live. Unplug the camera when parking for long periods, or hardwire it with a low-voltage cutoff.
- Nothing happens after hardwiring. Check the tap is the right way round, both fuses are seated, and the ground bolt is tight on bare metal.
- The cable pops out of the headliner. Tuck it slightly further in or add a small adhesive clip where it's hidden.
- Radio interference. Route the cable away from the antenna and fit the ferrite core if your kit includes one.
- A trim clip broke. Old plastic clips can break, and spares are cheap. Replace it so the trim doesn't rattle.
When to call a pro
If you're unsure where your airbags are or how to route around them, your pillar trims won't come off easily, or you want it hardwired but aren't confident testing circuits, have it professionally installed. Many car audio shops fit dash cams too.
FAQ
Can I install a dash cam myself?
Yes. A plug-in install using the 12V socket is a beginner job that needs little more than a nylon trim tool. Hardwiring is still DIY-friendly if you're comfortable testing circuits; if not, use a pro.
Does a dash cam drain your car battery?
It can, if it stays powered with the engine off, either from an always-live 12V socket or in parking mode. A hardwire kit with a low-voltage cutoff shuts the camera down before the battery runs too low to start the car.
Is it safe to run a dash cam wire down the A-pillar?
Yes, if the cable stays out of the curtain airbag's way: never in front of it or across its path, and never tied to it. Follow your car maker's guidance on routing.
Where is it legal to mount a dash cam?
It depends on where you drive. High up behind the rear-view mirror is the usual choice, but some US states only allow devices in set zones of the windshield. Check your local rules.
Keep a set of nylon trim tools handy for the next interior job, and see basic car tools every driver should own for the rest of the kit.
Browse all trim and interior tools.