How to Replace Car Door Speakers (Size, Fit and Wiring)
To replace car door speakers, remove the door panel (on some cars just the speaker grille), unscrew or drill out the old speaker and unplug it, then fit the new one with a mounting adapter and a plug-in wiring harness so you never cut factory wires. Most of the work is buying a speaker that fits: check the size, the mounting depth and the window clearance before you order.
What you need
- New speakers in the right size for your doors, plus vehicle-specific mounting adapters (brackets) if your car needs them
- Speaker wiring harness adapters that plug into the factory connectors, or crimp connectors if your car has no plug
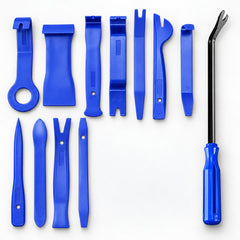
- A nylon trim removal tool kit for the door panel, grilles and clips. Nylon is softer than paint and trim, so it won't gouge them.
- Screwdrivers and small sockets. A 1/4-inch socket and bit set covers the Phillips and Torx bits and 4 to 14 mm sockets that door and speaker screws commonly use.
- A drill, a bit and eye protection, if the factory speakers are riveted in
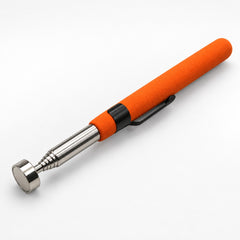
- A telescopic magnetic pickup tool for screws that drop inside the door. It extends to 73 cm but picks up steel and iron only, not aluminum or stainless steel.
- Foam tape or foam speaker rings, a 1.5 V AA battery for a polarity check, and a tape measure
Before you buy: size, depth and fit
Speaker size
Car speaker sizes such as 5.25, 6.5, 6.75 or 6x9 inches are nominal labels, not exact measurements, and door speaker sizes vary between models, years and even trim levels. The easiest way to find yours is a vehicle fit guide from a speaker maker or car audio retailer, entered with your exact model, year and sound system. If you can't find one, take out one old speaker and measure:
- The cutout diameter (the hole the speaker sits in)
- The screw hole spacing, center to center
- The free depth behind the mounting surface
Mounting depth and window clearance
This is the measurement people skip. When the window is down, the glass sits inside the door, often right behind the speaker, so a deep magnet can hit it. Find the new speaker's mounting depth on its spec sheet (from the mounting flange to the deepest point of the magnet) and compare it with the space behind the mounting surface with the window fully down. If it's tight, a thicker spacer ring moves the speaker outward, but check the door panel and grille still clear the front of the speaker. Choose plastic spacers over MDF in doors, because rainwater runs down inside every door.
Adapters and brackets
Car makers often use their own speaker shapes and screw patterns, and some factory speakers are molded into a plastic bracket or riveted to the door. A vehicle-specific adapter bridges the factory opening and a standard round aftermarket speaker. Check three things: the adapter's center hole fits the speaker's frame, its outer edge fits the factory opening, and its screw holes line up with the door.
Wiring harness adapters
A speaker harness adapter plugs into the factory speaker connector at one end and has two terminals for the new speaker at the other. Your factory wiring stays intact, so you can refit the old speakers later. Still check the polarity markings, because adapters are occasionally wired backward.
Factory amplifiers and premium systems
Most aftermarket car speakers are rated at 4 ohms. Some factory premium systems use their own amplifier and speakers rated well below that, so check the impedance printed on the back of an old speaker before you buy, and look for replacements that match. If you're keeping a low-powered factory radio, choose speakers with high sensitivity. Car audio retailers commonly suggest around 90 dB or more, so the speaker plays louder with the same power.
Coaxial or component?
Coaxial speakers have the tweeter mounted in the middle of the woofer and drop straight into one opening. Component sets split the woofer and tweeter and add a small crossover, so they need a spot for the tweeter (often the triangle trim by the mirror) and more wiring. For a first install, coaxials are simpler.
How to replace car door speakers step by step
Step 1: Get to the speaker
On some cars the speaker sits behind a grille that pops off with a nylon pry tool. On most, the door panel has to come off: follow our guide on how to remove a car door panel without breaking clips, including its airbag precautions. On a few cars the speaker is mounted to the back of the panel itself.
Step 2: Remove the old speaker
- Photograph how the speaker sits and where its connector goes.
- Undo the screws while holding the speaker, so neither drops into the door. If a steel screw does fall in, fish it out through an access hole with the magnetic pickup.
- If the speaker is riveted, put on eye protection. Use a bit about the size of the rivet's shank, center it on the rivet and drill slowly just until the head comes off.
- The rest of the rivet usually falls inside the door. Fish it out so it can't rattle. A magnet picks up steel parts, but many rivets are aluminum, so you may need your fingers through an access hole.
- Press the tab on the connector and unplug the speaker. Never pull on the wires.
Step 3: Fit the adapter
- Wipe the mounting area clean.
- Put foam tape on the back of the adapter so it seals against the door and can't buzz.
- Screw it to the door, using the factory holes where possible. If you must drill new holes, check what's behind first (window glass, regulator, wiring), and paint bare metal edges to slow rust.
Step 4: Connect the speaker with the right polarity
Polarity matters. If one speaker is wired backward, its cone moves in while the other moves out, the bass partly cancels and the sound turns thin.
- Find the speaker's terminals. They're marked with + and -, or a colored dot for positive. On many speakers the wider terminal is positive, but follow the markings.
- Not sure? Test it before you connect anything: briefly touch a 1.5 V AA battery to the speaker's terminals. When the battery's positive meets the speaker's positive, the cone moves outward. Use a single AA cell, for a moment only.
- Check which harness lead is positive. Use the adapter's markings, or a wiring diagram for your car if you're splicing into factory wires. Wire colors differ between makers, so don't guess from a stripe.
- Connect positive to positive and negative to negative, then plug the harness adapter into the factory connector until it clicks.
Step 5: Mount the speaker and test before the panel goes on
- Route the wires so they can't touch the cone or the window mechanism. Secure them with a cable tie if needed.
- Screw the speaker to the adapter evenly, snug but not overtight. Most adapters are plastic and strip easily.
- Plug the window switch back in (if the door has an airbag, follow your manual before reconnecting the battery), turn the radio on and play something with bass. Use the balance and fader to check each speaker on its own.
- Run the window all the way down and up while listening for contact.
- If the panel sits close to the speaker, fit a foam ring around it. It helps stop buzzes and directs sound through the grille.
Step 6: Refit the door panel
Reconnect the handle cable and every connector, replace any broken clips, then press the panel home clip by clip. The door panel guide linked above covers refitting in detail.
Troubleshooting
- No sound: the harness isn't fully clicked in at one end, or the fader is set away from that door.
- Thin, weak bass: usually one speaker wired backward. Recheck polarity. Gaps between the adapter and the door can also cost bass.
- Buzzing or rattling: a loose adapter, a wire slapping inside the door, a dropped screw or rivet, or a missing panel clip.
- The window hits the speaker: it's too deep for that door. Use a thicker spacer or a shallower speaker.
- Distortion at high volume: a factory radio has limited power. New speakers can sound cleaner, but they can't add power the radio doesn't have.
When to call a pro
A car audio shop is worth it if your car has a premium system with its own amplifier and sound processing that you're not sure how to match, if the door has an airbag and you're not confident with the precautions, or if you're adding an amplifier and need new wiring through the door hinge.
FAQ
Can I replace car speakers myself?
Yes. With plug-in harness adapters and the right brackets, it's mostly a door panel removal and a handful of screws. The first door takes longest; the second goes much faster.
Do I need an amp for aftermarket door speakers?
Not for a basic upgrade. Choose high-sensitivity speakers with a power rating that suits a factory or aftermarket radio. An amplifier only becomes worthwhile if you want more volume and bass than the radio can deliver.
How do I know what size speakers are in my car?
Use a vehicle fit guide for your exact model, year and sound system, or remove one speaker and measure the cutout, screw spacing and depth. Don't judge by the grille, which is often larger than the speaker.
Does speaker polarity matter?
Yes. Speakers wired out of phase with each other partly cancel their bass. Match + to + on every speaker, and use the AA battery test if you're unsure.
Do I need to disconnect the battery to change door speakers?
Usually not, as long as the ignition and radio are off. If the door contains an airbag, follow your manual: that normally means disconnecting the negative terminal and waiting the specified time before unplugging anything.
Upgrading the head unit too? See how to remove a car radio from the dash.
Browse all trim and interior tools.